

Now Reading: No-Bake Peanut Butter Oat Cups (Easy Recipe)
-
01
No-Bake Peanut Butter Oat Cups (Easy Recipe)


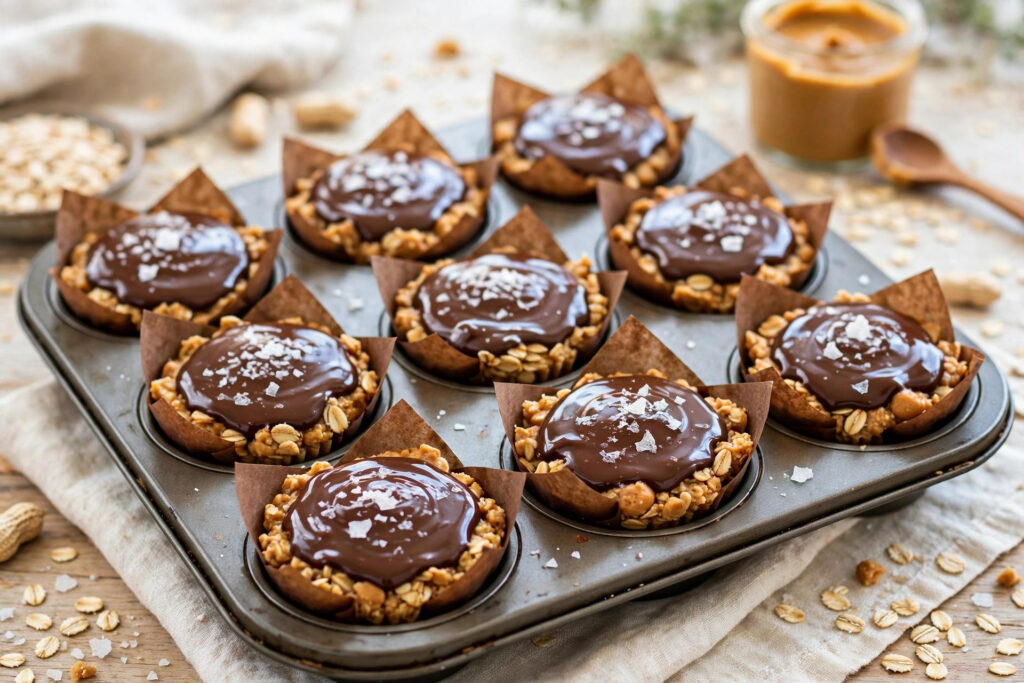
Some treats earn a permanent spot in the fridge, and these no bake peanut butter oat cups are exactly that kind of recipe. Everything you love about a peanut butter cup, the salty sweet peanut butter and the snap of chocolate, comes back as a chewy oat cup for any time of day. A warm peanut butter and honey mixture gets stirred through old fashioned oats, pressed into muffin cups, and finished with a glossy layer of melted chocolate and a pinch of flaky sea salt.
The best part is that these cups are completely no bake. No oven, no candy thermometer, no complicated steps. You need one saucepan, one bowl, and about 15 minutes of hands on time plus a chill in the fridge. They work for weekly snack prep, lunchbox treats, and last minute dessert when guests show up.
Quick Recipe Overview
Prep Time: 15 minutes
Chill Time: 1 hour
Total Time: 1 hour 15 minutes
Servings: 12 cups
Calories: About 210 kcal per cup
Quick Ingredients: old fashioned rolled oats, creamy peanut butter, honey or pure maple syrup, vanilla extract, cinnamon, fine sea salt, chocolate chips, coconut oil, flaky sea salt.
Quick Steps: Line a muffin pan. Warm the peanut butter mixture. Stir in the oats. Press into cups. Top with melted chocolate. Chill until set.
Why These Peanut Butter Oat Cups Work
Three things carry this recipe. The warm peanut butter mixture coats every oat, so the cups hold together instead of crumbling. Honey binds the mixture while it chills, and the chocolate top seals each cup. Nothing here needs an oven.
- Genuinely no bake, the oven stays off and the fridge does all the work
- Wholesome ingredients, oats, peanut butter, honey, and dark chocolate, nothing artificial
- Ready fast, 15 minutes of active time, then chilling
- Meal prep friendly, these cups keep beautifully for days
- Easy to adapt, swap in maple syrup, dairy free chocolate, and certified gluten free oats
Ingredients
Here is what you need for one batch, plus notes on why each ingredient matters:
- 1 1/2 cups (135g) old fashioned rolled oats, the chewy backbone of the cups. Do not use quick oats, which turn mushy, or steel cut oats, which stay too hard.
- 1/2 cup (128g) creamy peanut butter, use a creamy, no stir peanut butter. Natural peanut butter that separates can make the cups too oily or too dry.
- 1/3 cup (113g) honey or pure maple syrup, the binder and sweetener in one. Honey gives classic flavor, and pure maple syrup keeps the recipe fully vegan.
- 1 teaspoon pure vanilla extract, rounds out the peanut butter flavor.
- 1/2 teaspoon ground cinnamon, a warm background note.
- 1/4 teaspoon fine sea salt, sharpens all the flavors. Do not skip it.
- 1/2 cup (90g) chocolate chips, plus more for topping, semi sweet or dark. Use dairy free chocolate chips to keep the cups vegan.
- 1 teaspoon coconut oil, melted with the chocolate for a glossy, crackly top that sets smoothly.
- Flaky sea salt, for topping (optional), the finishing touch that makes the chocolate sing.
How to Make Peanut Butter Oat Cups
- Prep the muffin pan. Line a 12 cup muffin pan with paper or silicone liners. Silicone liners are ideal, since the chilled cups pop right out with zero sticking.
- Warm the peanut butter mixture. In a medium saucepan over low heat, combine the peanut butter, honey or maple syrup, vanilla, cinnamon, and salt. Stir until smooth, warm, and pourable, about 1 to 2 minutes. Do not boil. Overheating can make the peanut butter seize or taste scorched.
- Mix with the oats. Remove the pan from the heat and add the rolled oats. Stir thoroughly until every single oat is evenly coated in the warm peanut butter mixture. Uncoated dry pockets are the difference between sturdy cups and crumbly ones.
- Fill the muffin cups. Divide the oat mixture evenly among the lined cups, about 2 tablespoons per cup. Press down firmly with the back of a spoon or damp fingers to compact each cup. Tightly packed cups hold their shape, and loosely packed ones fall apart.
- Melt the chocolate. In a microwave safe bowl, combine the chocolate chips and coconut oil. Microwave in 20 second bursts, stirring well between each burst, until smooth and glossy. No microwave? Melt gently in a heatproof bowl set over simmering water.
- Top with chocolate. Spoon about 1 teaspoon of melted chocolate over each oat cup and spread to cover the top. While the chocolate is still wet, sprinkle with extra chocolate chips and flaky sea salt if desired.
- Chill until set. Refrigerate the pan for at least 1 hour, until the chocolate is fully set and the cups hold their shape when lifted. The chill is what turns the mixture from soft to sliceable.
- Serve and store. Peel away the liners and enjoy chilled or at cool room temperature. These cups keep wonderfully, which is exactly why they are a meal prep favorite.
Tips for Perfect Peanut Butter Oat Cups
- Use no stir peanut butter. The drippy natural kind separates and throws off the ratio, and your cups can turn out greasy or dry. A standard creamy peanut butter gives consistent, chewy results every time.
- Press firmly, then press again. Compacting is the structural secret of good oat cups, and crumbling means they were not pressed tightly enough.
- Do not boil the peanut butter mixture. Gentle warmth is all you need. Boiling toughens the texture and dulls the peanut flavor.
- Coconut oil is worth it. Just a teaspoon gives the chocolate topping a professional gloss and a clean snap.
- Chill fully before unmolding. An hour minimum, and two hours is even better. Impatience here is the top cause of misshapen cups.
- Damp fingers prevent sticking. Lightly wet your fingers or the back of a spoon before pressing, and the sticky mixture will not cling.
Easy Variations
Try these twists on the classic cups:
- Almond butter oat cups: swap the peanut butter for creamy almond butter and top with sliced almonds.
- Double chocolate: stir 2 tablespoons of cocoa powder into the warm peanut butter mixture for an extra chocolatey base.
- Trail mix cups: fold 1/3 cup of chopped nuts, raisins, or dried cranberries into the oat mixture.
- Sea salt caramel: drizzle the set chocolate tops with a little caramel sauce and extra flaky salt.
- Protein packed: add 2 tablespoons of vanilla protein powder to the oat mixture, plus an extra teaspoon of honey if it seems dry.
- Nut free: use sunflower seed butter instead of peanut butter, same method, safe for lunchboxes.
Storage and Make Ahead
Store these cups in an airtight container in the refrigerator for up to 1 week, with parchment between stacks so the chocolate tops do not stick. For longer storage, freeze for up to 3 months. Thaw in the fridge for an hour before serving, or enjoy them straight from the freezer for an extra chewy treat. They also travel well: pack them in a lunchbox with an ice pack and they will hold their shape for hours. For safe storage times on all leftovers, follow the USDA leftovers and food safety guidelines.
Serving Ideas
Serve these cups chilled with coffee, packed in a lunchbox alongside fruit, or set out on a dessert board next to fresh berries. They also make a thoughtful homemade gift, stacked in a small box lined with parchment and tied with a ribbon.
Frequently Asked Questions
Are peanut butter oat cups healthy? They are made with wholesome ingredients, oats, peanut butter, honey, and dark chocolate, and contain no refined flour or artificial anything. They are still a treat, since there is sugar and chocolate involved, but as no bake snacks go, these cups are a genuinely better for you option.
Can I make these peanut butter oat cups vegan? Yes. Use pure maple syrup instead of honey and dairy free chocolate chips. Everything else in the recipe is already plant based.
Can I make them gluten free? Absolutely. Just use certified gluten free rolled oats. The remaining ingredients are naturally gluten free.
Why are my oat cups falling apart? Almost always under compacting or under chilling. Press the mixture down very firmly into each cup, and refrigerate a full hour, longer if you like, before unmolding.
Can I use quick oats instead of rolled oats? You can in a pinch, but the texture suffers. Quick oats make gummy, dense cups. Old fashioned rolled oats give these cups their signature chew.
Do I have to use the coconut oil? It is strongly recommended for a glossy chocolate top that sets with a snap, but you can skip it. The chocolate will still set, just with a softer, less shiny finish.
You May Also Like
For another no bake treat, try our easy homemade butter toffee broken into bite size pieces.
More snack ideas: our soft vegan blueberry muffins.
Stay Informed With the Latest & Most Important News
Previous Post
Next Post





Advertisement